
An independent podcast producer I worked with once spent over four hundred dollars paying an outside mastering studio to polish a ten-episode audio series. When the final masters came back, the host listened on her phone speakers and complained that the vocals sounded thin and harsh compared to top-charting shows.
She assumed that throwing money at an expensive mastering engineer would automatically make her audio sound like a million bucks. But because the raw vocal tracks had room reflections, muddy sub-bass, and inconsistent peak levels, the mastering chain simply amplified those existing flaws.
Mastering is not magic sauce that fixes a bad recording. It is the final quality control step—the coat of polish that balances frequencies, controls dynamic range, and makes sure your track translates cleanly across everything from cheap earbuds to car subwoofers.
The good news? You do not need thousands of dollars in analog rack gear to get commercial-grade results. With free open-source software, smart metering habits, and affordable tools like Audacity, Adobe Audition, Auphonic, and iZotope RX, you can master your own tracks at home without blowing your budget.
Mixing vs. Mastering (Fix the Foundation First)
Before touching a single mastering plugin, you need to understand where mixing ends and mastering begins.
Mixing is about balancing individual tracks against each other—setting volume faders, panning instruments, applying vocal EQ, and dialing in reverb. Mastering operates on the finished stereo mixdown. If your kick drum is drowning out the bassline or the lead vocal is buried under guitar tracks, going back to the mix session is the only real fix. Trying to fix individual instrument balance during mastering is like trying to unbake a cake.
Before exporting your mix for mastering, make sure your master bus has plenty of headroom. Leave your master channel peaking between -6 dB and -3 dBFS.
If your mix is already hitting 0 dBFS or running through a heavy brickwall limiter on your mix bus, your mastering tools will have no room to breathe, causing ugly distortion and squished dynamics.
Building Your Budget Mastering Environment
You do not need a multi-million dollar studio to master audio, but you do need an environment that does not lie to your ears.
If you are mastering in an untreated bedroom with boomy bass corners, your brain will trick you into cutting low-end frequencies that actually sound fine everywhere else.
If room treatment is out of your budget, grab a decent pair of neutral studio monitor headphones. Standard commercial consumer headphones boost bass and color highs, while flat studio headphones let you hear the raw truth of your mix.

For your digital audio workstation (DAW), open-source editors like Audacity give you a clean slate for multi-track editing, spectral visualization, and VST plugin hosting without subscription fees.
If you need a dedicated budget DAW with full mixer routing, platforms like Soundop and FL Studio give you deep parameter control for a fraction of traditional enterprise audio software costs.
The Budget Mastering Signal Chain (Step-by-Step)
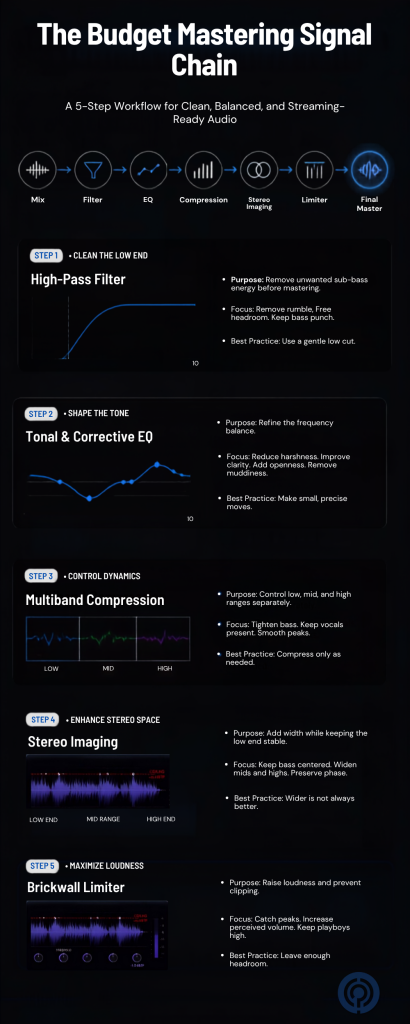
A professional mastering chain does not rely on twenty different plugins stacked together. It relies on subtle, intentional tweaks across five core processors. Here is the step-by-step signal chain used by pro engineers:
1. High-Pass Filter (Cleaning Sub-Rumble)
Subwoofers will happily waste massive amounts of power pushing frequencies below 20Hz that your ears can’t even pick up. Desk bumps, AC hum, and foot stomps introduce sub-bass energy that eats up your headroom before your limiter even gets a chance to work. Drop a high-pass filter right around 25Hz to 30Hz with a gentle 12 dB slope—it clears out that invisible mud while keeping your kick drum and bassline solid.
2. Surgical and Tonal EQ
Mastering EQ is about broad brushstrokes, not aggressive cuts. Use a parametric EQ to notch out narrow resonant frequencies that cause ear fatigue (often around 2.5kHz to 4kHz in voiceovers). Follow that with subtle wide-band shelving boosts—like a gentle 0.5 dB high-shelf boost above 8kHz for air, or a 1 dB low-end dip around 300Hz to clear up mid-range boxiness.
3. Multiband Compression
Single-band compressors react to whatever frequency hits them hardest—usually the bass or kick drum. That causes “pumping,” where vocal volume drops every time the bass hits. A multiband compressor splits your signal into separate frequency bands (lows, mids, highs), letting you tame unruly low-end peaks without squishing vocal clarity.
4. Stereo Imaging and Width
Keep your low frequencies (everything below 150Hz) strictly in mono. Low-end stereo phase issues cause weak bass translation on club sound systems and vinyl cuts. Use a stereo imager to sum sub-bass to mono while adding subtle width to mid and high frequencies above 1kHz.
5. Brickwall Limiting and Loudness Maximization
The brickwall limiter is your last line of defense. It caps your peaks so your track doesn’t clip while letting you push the overall energy up. Just remember to wipe out mouth clicks and background hum before the limiter—otherwise, pushing your ceiling will pull all those nasty little room noises right to the front of the mix. Set your output ceiling to -1.0 dBFS True Peak to prevent inter-sample clipping when streaming services compress your file.
Workhorse Audio Editors for Polishing & Restoration
Before your track hits the final limiter, background noise, lip clicks, and electrical hums need to be removed. Leaving hums or mouth clicks in your raw audio will cause your final mastering processors to amplify those unwanted sounds.
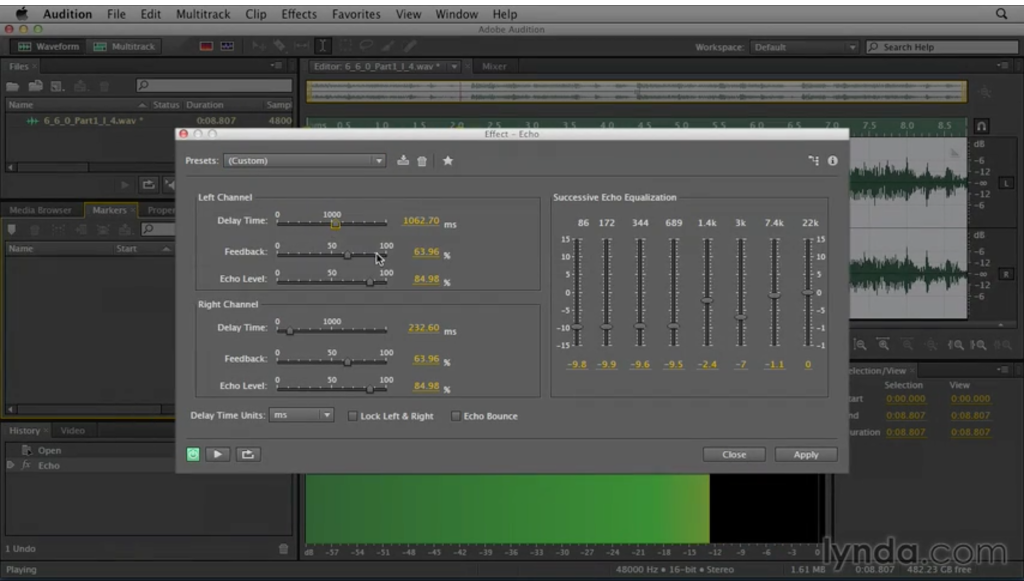
For detailed waveform editing, spectral noise removal, and match loudness processing, Adobe Audition provides a comprehensive workbench. Audition lets you visually paint out background clicks, tape hiss, and HVAC hum using frequency spectral displays before running your file through multi-band dynamics processors.
When dealing with severely degraded audio—like remote interview recordings or noisy room acoustics—spectral repair tools like iZotope RX provide specialized de-hum, de-clip, and de-reverb tools. If you don’t strip out room noise before hitting your compressor, those quiet AC hums and fan noises will get yanked right up into the foreground the second your dynamics get squished.
Automated AI Mastering Platforms (When You Need Speed)
When you’re pumping out daily podcasts or churning through client voiceovers on tight deadlines, hand-mastering every single file gets brutal fast. Automated cloud platforms give you a fast alternative to get your audio broadcast-ready without sitting over a DAW for hours.

For creators who need automatic loudness normalization and adaptive leveling, Auphonic analyzes your track and applies intelligent EQ, noise gating, and volume leveling to match global podcast and broadcast standards.
Tools like Audo Studio and Descript handle background noise removal and level matching behind the scenes, letting you fix rough vocal takes with a quick toggle instead of manual keyframing.
Mastering for Streaming Targets (-14 LUFS Myth vs. Real World)
Don’t fall into the trap of panicking over exact LUFS targets. You’ll hear endless debates online about hitting -14 LUFS integrated for Spotify, but if you inspect commercial pop or rock tracks, most of them are pushed way harder—often between -9 and -6 LUFS. Spotify will just dial down the playback gain on louder masters to keep volume consistent across tracks.
For spoken word podcasts and audiobooks, aim for -16 LUFS integrated for stereo files or -19 LUFS for mono voice tracks. Always set your True Peak ceiling to -1.0 dBFS True Peak so lossy MP3 encoding doesn’t create nasty inter-sample distortion during streaming conversion.
Common Budget Mastering Pitfalls to Avoid
Even with good plugins, easy mistakes can wreck a master:
- The Loudness War Trap: Squishing your dynamics just to make your track louder than everyone else causes ear fatigue and destroys transient punch. Loudness is easy to achieve; clarity and punch require discipline.
- Mastering Without Reference Tracks: Always import two or three professionally mastered reference tracks into your DAW session. Compare your master against commercial releases at matching playback volumes to spot EQ imbalances immediately.
- Ignoring Mono Compatibility: Test your master in mono. If your vocals or snare drum collapse or disappear when flipped to mono, you have stereo phase cancellation issues that must be fixed back in the mix.
Wrap Up
You don’t need a wall of vintage outboard gear or thousands in plugin bundles to produce polished, competitive masters. It is about knowing how your signal chain behaves, keeping your headroom under control, and relying on reliable software.
Once you get used to cleaning up low-end mud, dialing in multi-band compression, and keeping your meters honest with Audacity, Adobe Audition, Auphonic, and iZotope RX, your mixes will sound full, clear, and ready for any speaker.

Leave a Comment