Organizing articles with categories and tags sounds simple, but doing it well can completely change how your readers experience your site. When everything is tidy and easy to find, visitors stay longer, read more, and actually enjoy being there.
This guide walks you through exactly how to organize your content using categories and tags in a clear, human way, with simple structures you can copy.
If your blog is starting to feel messy, you are not alone. As more articles pile up, it becomes harder for readers to find what they want, and even harder for you to keep everything structured. The good news is that categories and tags can fix that, as long as you use them with a plan.
Think of this as your step‑by‑step roadmap for turning a chaotic blog into a clean, easy‑to‑navigate content library.
What Are Categories And Tags?
Before you start changing anything, it helps to understand what each one is supposed to do.
Categories: Big Buckets For Your Content
Categories are your main content groups.
They answer the question: “What is this article mainly about?”
- Categories are broad.
- Every article should belong to at least one category.
- Many blogs use 3–8 main categories.
Examples of categories for a marketing blog:
- Content Marketing
- SEO
- Social Media
- Email Marketing
- Analytics
If your blog were a bookstore, categories would be the sections: Fiction, Business, Self‑Help, Technology, and so on.
Tags: Specific Details Or Topics
Tags are more specific.
They answer the question: “What topics, tools, people, or details does this article talk about?”
- Tags are narrow.
- An article can have several tags.
- Tags help connect related posts across different categories.
Examples of tags:
- blog headlines
- keyword research
- Instagram Reels
- welcome email sequence
- bounce rate
In that same bookstore example, tags would be the keywords or sub‑topics inside books: habits, productivity, marketing funnels, LinkedIn outreach.
Why Good Structure Matters?
Getting categories and tags right does more than just “look organized”. It changes how your whole site works.
How It Helps Your Readers
Take an example of WordPress. When you publish content using WordPress, organizing your articles properly is just as important as writing them well. Two simple tools help you do this: categories and tags.
Think of them as a system that keeps your website clean, structured, and easy to explore.
How to Assign Categories in WordPress
Categories are used to group your content into broad topics. Every blog post in WordPress should belong to at least one category.
Here’s how you assign categories:
- Open your post in the WordPress editor.
- Look at the right-hand sidebar.
- Find the Categories section.
- Select an existing category or click Add New Category to create one.
- Save or update your post.
Categories act like main sections of a website, such as:
- Blogging Tips
- Marketing
- Tutorials
- Case Studies
You can also create subcategories if needed, which helps organize content even further.

How to Assign Tags in WordPress
Tags are more specific than categories. They describe individual details or keywords related to a post.
To add tags:
- In the same post editor, locate the Tags section.
- Type relevant keywords related to the article.
- Press Enter to add each tag.
- Update the post.
For example, a post under the category Blogging Tips might have tags like:
- SEO
- Content writing
- WordPress plugins
- Website structure
Tags help connect related posts across different categories.

When articles are neatly grouped:
- Readers can quickly browse topics they care about.
- They can go deeper on a subject by clicking a category or tag.
- They do not feel lost or overwhelmed.
A clean structure feels like a store where signs are clear and everything is in the right aisle.
How It Helps Your Site
Good structure also supports:
- Better internal linking.
- Stronger topical authority for SEO.
- Easier content planning and updating.
Instead of random posts, you slowly build content hubs around key themes.
Step 1: Map Out Your Main Categories
Start with categories first. If your categories are messy, your tags will not save you.
Look At What You Already Write About
Take a simple approach:
- List 20–30 of your existing articles.
- Next to each one, write the main topic in one or two words.
- Look for patterns and themes.
For example, your list might look like this:
- “How to Grow Your Email List” → Email
- “Beginner’s Guide to SEO” → SEO
- “Instagram Content Ideas” → Social
- “How to Build a Content Calendar” → Content
- “Google Analytics Basics” → Analytics
You will start to see groups form on their own.
Choose 3–8 Core Categories
Now, turn those repeated themes into categories.
Keep a few simple rules in mind:
- Keep them broad, not ultra‑specific.
- Use words your readers would understand instantly.
- Aim for 3–8 main categories, not 20.
Example set for a business blog:
- Marketing
- Sales
- Operations
- Leadership
- Tools & Tech
If you already have a lot of content, you can also create sub‑categories later, like:
- Marketing
- Content Marketing
- Paid Ads
- Branding
But start with your top‑level ones first.
Step 2: Define What Each Category Covers
Once you have your category list, give each one a clear meaning so you do not guess later.
Write A Short Description For Every Category
For each category, write 1–2 lines that answer:
- What types of articles belong here?
- What does not belong here?
Example:
- Content Marketing
Articles about planning, creating, and distributing content like blogs, videos, and guides. Not for social ad campaigns or email automation. - SEO
Articles about search engines, keywords, on‑page optimization, link building, and search analytics. - Email Marketing
Articles about newsletters, campaigns, sequences, subject lines, and email performance.
You do not need to show these descriptions to your readers, but they help you stay consistent behind the scenes.
Avoid Overlapping Categories
If you are not careful, your categories might start to overlap. That makes decisions harder.
For example, if you have:
- Marketing
- Digital Marketing
- Online Marketing
Those are basically the same thing. It is better to pick one.
Good questions to ask yourself:
- Would a reader be confused choosing between these?
- Can one article clearly belong to more than one of these main categories?
If the answer is “yes” a lot, consider merging or renaming.
Step 3: Clean Up Old Categories
If your site already has categories, there is usually some clutter.
How To Tidy Your Existing Setup
Here’s a simple way to clean up:
- Export or list your current categories.
- Highlight obvious duplicates or near‑duplicates.
- Mark categories with only 1–2 posts.
- Decide which ones to keep, merge, or delete.
You can:
- Merge similar categories into one stronger category.
- Reassign lonely posts to a better‑fitting category.
- Delete categories that no longer make sense.
Take your time here. This one clean‑up makes things much easier in the long run.
Step 4: Use Tags As Details, Not Mini Categories
Once your categories feel clear, you can tackle tags.
How To Think About Tags
Tags should:
- Describe details in the article.
- Link posts that share very specific topics.
- Help readers discover related content.
They should not:
- Be used for every random word.
- Duplicate your categories.
- Be created fresh for every single post if they are never reused.
Good Tag Examples
For a post titled “How To Write Better Blog Headlines”, you might use:
- blog headlines
- copywriting
- content strategy
- click‑through rate
For a post “Beginner’s Guide to Google Analytics”, you might tag:
- Google Analytics
- website traffic
- metrics
- bounce rate
Those tags help tie similar posts together across your site.
Step 5: Create A Simple Tagging Rule
To stop tags from getting out of control, create small rules for yourself or your team.
A Few Easy Rules To Follow
You can adopt something like:
- Maximum 5–7 tags per article.
- No tag should repeat a category name.
- Only create a new tag if you plan to use it again.
- Tags should be two to three words at most, unless it is a product or brand name.
You might also keep a shared list of “approved tags” in a simple document so everyone uses the same wording. For example, always email newsletter, not sometimes newsletter and sometimes email letters.
Step 6: Reorganize Existing Articles
Once your structure is ready, it is time to apply it to your current content.
Start With Your Most Important Articles
You do not have to fix everything in one day. Focus on:
- Your top traffic posts.
- Your most recent posts.
- Your most important “pillar” or “cornerstone” articles.
For each article:
- Assign one main category (and maybe a sub‑category if you use them).
- Add 3–7 relevant tags that follow your rules.
- Remove any old tags that do not fit or are never reused.
Little by little, your content library will start to feel more structured.
Step 7: Plan New Content Around Categories
A clear category system is also a great planning tool.
Use Categories To Spot Gaps
Look at your list of categories and ask:
- Which category has the most content?
- Which category feels thin or empty?
- What topics in each category are still missing?
You can then plan new posts to fill those gaps.
For example, in Email Marketing, if you already have:
- “How to Grow Your Email List”
- “Best Days To Send Emails”
You might add:
- “How To Write Welcome Email Sequences”
- “Email Subject Lines That Get Opens”
This slowly builds a well‑rounded set of resources under each category.
Step 8: Keep Things Simple For Readers
Your structure should feel obvious to visitors, not clever.
Make Navigation Clear
You can:
- Show your main categories in the top menu.
- Add category links near the top or bottom of each article.
- Show a small list of popular tags in your sidebar or footer.
If someone lands on a single article from search or social, they should be able to click a category or tag and easily find more on that topic.
Use Friendly Names
Avoid jargon when possible. Instead of:
- Miscellaneous
- Thoughts
- Other
Use clearer names like:
- Behind The Scenes
- Personal Stories
- Quick Tips
Think about how a new reader would feel reading your menu for the first time. Simple names usually win.
Step 9: Common Mistakes To Avoid
It is very easy to overdo categories and tags. Here are some of the usual problems.
Too Many Categories
If you have 20 or 30 categories, each with a handful of posts, your site will feel scattered. Try to:
- Reduce and merge where possible.
- Keep most posts within a core set of categories.
Tags Used Like Hashtags Everywhere
Treating tags like social media hashtags is a common trap.
For example:
- #marketingtips #digitalmarketing #tips #online #growth #strategy #ideas
This does not help your reader much. Focus on tags that actually group similar posts, not just words that sound nice.
Category Names That Are Too Vague
Names like Other, General, or Various slowly become a dumping ground. Try not to rely on these if you can avoid it. If you need them during a transition phase, plan to replace them later.
Step 10: Build A Simple Style Guide
If more than one person publishes on your site, a short style guide saves a lot of confusion.
What To Include In Your Guide
You can keep it very simple:
- A list of all categories and what belongs in each.
- A list of common tags and how to spell them.
- Rules on how many tags to use.
- A few examples of “good” and “bad” category and tag usage.
Store it in a shared document and update it as your content grows.
How Categories And Tags Work Together
When you use both properly, they make a strong system.
A Quick Way To Think About It
You can think of it like this:
- Categories = main shelves in your library.
- Tags = labels on each book showing specific topics.
For example, a single article might be:
- Category: Content Marketing
- Tags: blog strategy, content calendar, editorial workflow
Another might be:
- Category: Email Marketing
- Tags: welcome sequence, new subscribers, automation
Different category, but maybe both use the tag content calendar or editorial workflow if it applies. That is how readers and search engines begin to understand your site’s deeper topics.
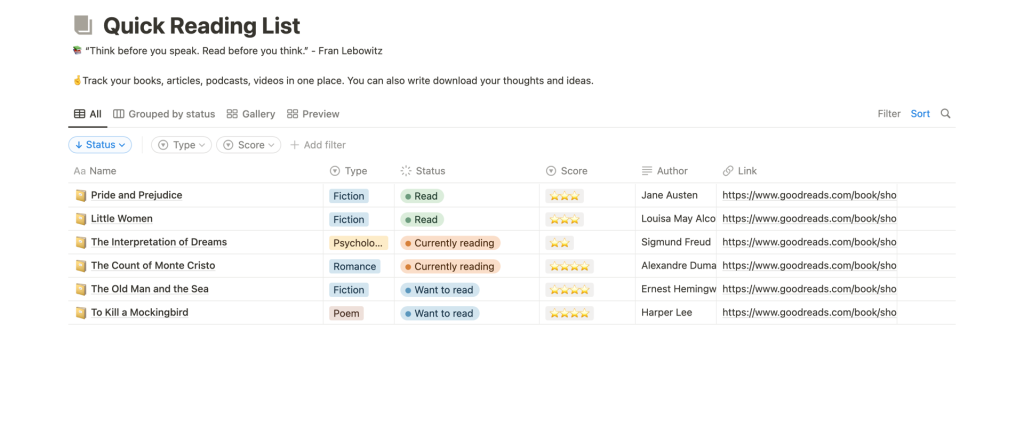
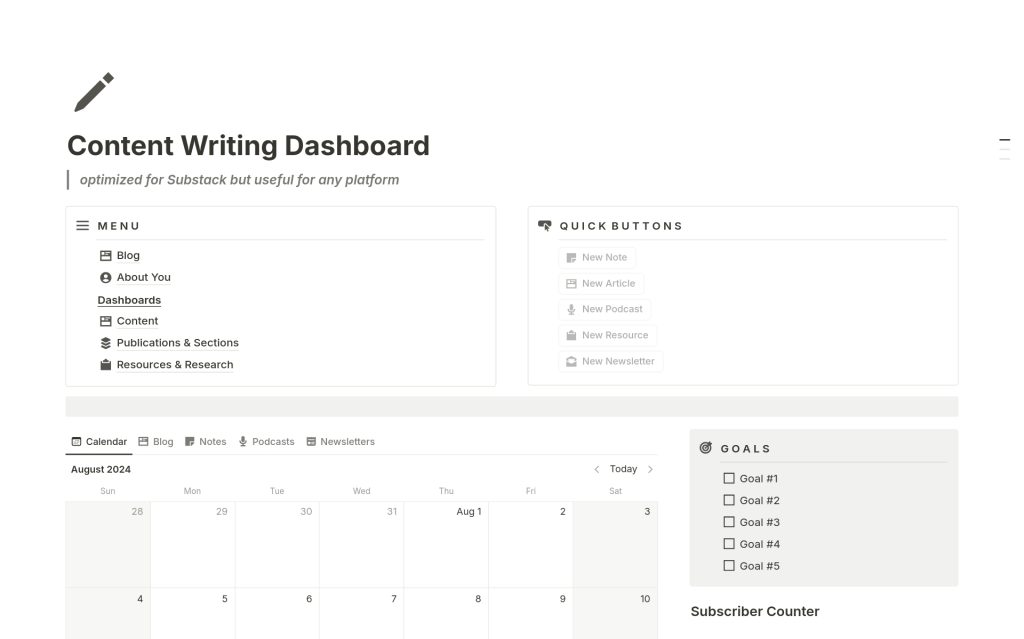
Saving and Organizing Articles Using Notion
Once readers find articles they like, many want a way to save them for later instead of losing the link. This is where tools like Notion come in handy.
Notion allows users to create a personal library where they can store:
- Blog articles
- Helpful links
- Research notes
- Ideas they want to revisit
How Readers Can Save Articles in Notion
- Open Notion and create a new page called Reading List or Saved Articles.
- Add a simple table with columns like:
- Article Title
- Website Link
- Category
- Notes
- Copy the article link and paste it into the table.
- Assign a category (for example: SEO, Writing, WordPress).
- Add a short note about why the article is useful.

This makes it easy to return to valuable content anytime instead of searching through browser history.
Keeping Your System Healthy Over Time
Your blog will grow over time, and your content structure should be able to grow with it. Categories and tags are not something you set once and forget. A little maintenance now and then keeps everything organized and easy to navigate.
Review Once Every Few Months
Every few months, spend a little time to:
- Check for tags that have only one article attached to them.
- Look for new categories that might be forming naturally as you publish more content.
- Merge similar tags or categories that overlap.
- Remove anything that no longer fits your current focus or direction.
This does not need to be a big overhaul every time. Small, regular tweaks are enough to keep the system clean, logical, and reader-friendly.
A well-maintained structure helps both search engines and readers understand your content better—and it keeps your blog from feeling cluttered as it grows.
Wrap Up
It is normal for your focus to shift slightly as your audience grows. You can:
- Rename categories if needed.
- Add a new category when you have several posts on a new theme.
- Retire older categories if your content direction has changed.
The key is to always ask: “Will this make things clearer for my readers?” If the answer is yes, it is likely a good change.
When you take the time to organize your articles with clear categories and thoughtful tags, your site stops feeling like a random list of posts and starts working like a real library of helpful content. It becomes easier for readers to explore, easier for you to plan, and easier for search engines to understand what you are all about.
Start small. Pick your main categories, clean up a handful of posts, and set simple tagging rules. With each article you organize, your content becomes just a bit more powerful, useful, and enjoyable for the people you are trying to help.


Leave a Comment