
A hard cut at the start or end of a song sounds jarring. The music just… starts. Or stops. No transition, no breathing room. The listener doesn’t get a moment to settle in or come back to wherever they were. Fades fix that. A well-timed fade in eases someone into the music. A fade out gives the track a place to land.
And it’s not just for full songs. If you’re editing a podcast intro, cutting background music under a voiceover, adding a score to a video, or trimming a track for a presentation—fades are one of the most used edits in audio production and one of the simplest to get right.
Here’s how the whole thing works, what to watch out for, and which tools make it easiest.
What Fade In and Fade Out Actually Do
A fade in just brings the volume up from zero so the music eases in. A fade out turns the volume down until it’s completely silent.
Under the hood, your audio software is simply turning a digital volume knob for you over a couple of seconds. You set where the fade starts and ends, and the software draws a smooth volume line between those points.
Here’s the thing: most editing apps let you pick how that line curves, which actually changes how smooth the transition feels.
- Linear fade: drops the volume at a flat, steady speed. It sounds kind of robotic and usually feels like it cuts off too suddenly right at the tail end.
- Logarithmic (or exponential) curve: dips the loudest part fast, then trails off gently into silence. Since our ears don’t hear volume in straight lines, this curve feels completely natural to listen to. That’s why pretty much every pro editor uses it as the default.
- S-curve: starts slow, dips faster in the middle, and softens up at the end. This is what you want when you’re blending two different songs together so the transition doesn’t dip in the middle.
For most situations—ending a podcast background track, fading out intro music, trimming a song for a video—a 2 to 4 second logarithmic fade out sounds right. Fade ins can be shorter, around 0.5 to 1.5 seconds, depending on whether you want a subtle entrance or a longer build.
Fade In: When and How to Use It
The most common use for a fade in isn’t actually the start of a track—it’s bringing background music in under a voiceover without the music appearing suddenly. You might cut to music mid-sentence in a podcast or video, and a 1-second fade in makes that transition invisible rather than jarring.
For song intros, fade ins work well when:
- The track would otherwise start at an uncomfortably loud or abrupt moment
- You’re using a clip that starts in the middle of a song and the entry point sounds unnatural
- You want the music to build into the listener’s awareness rather than demand immediate attention
The mistake people make with fade ins is making them too long. A 10-second fade in for background music in a 60-second video is 10 seconds of audio that’s too quiet to do its job. Shorter is almost always better. Start with 1 second, listen back, and only extend it if something sounds wrong.
Fade Out: When and How to Use It
The fade out is one of the oldest production techniques in recorded music—it became popular in the 1950s and 1960s as a way to end tracks that didn’t have a natural stopping point, and it’s been a staple ever since.
For practical audio editing, you’ll use fade outs when:
- A background music track needs to end before the audio file does
- You’re cutting a full song down to a shorter clip and the new end point sounds abrupt
- You want to signal the end of a segment or section in a podcast
- The original recording ends at an awkward moment—maybe mid-phrase or mid-beat—and a fade masks it cleanly
According to Sound on Sound’s guide to fade techniques, the most common mistake with fade outs is cutting them too short. A fade that drops from full volume to silence in half a second just sounds like a volume cut. You need at least 2 to 3 seconds for a fade out to read as intentional. For music with lots of low end or reverb tail, 4 to 6 seconds is often better because those frequencies linger.
Crossfades: The Technique You Actually Need Most
A crossfade is a fade out on one clip combined with a fade in on the next, overlapping so there’s no gap or abrupt transition. This is what you use when:
- Two audio clips are placed back-to-back and the edit point sounds choppy
- You’re assembling a music mix and want smooth transitions between tracks
- A podcast recording has an edit point where the audio quality or room tone changes noticeably
The overlap duration depends on how much the two clips have to work with. For music edits, 0.5 to 2 seconds of overlap is typical. For dialogue edits where you’re just smoothing a cut, 50 to 100 milliseconds is often enough—you’re not actually hearing the crossfade, it just prevents the click that happens at a hard cut.
Tools That Handle Fades Well
Audacity — Best Free Option With Full Fade Control

Audacity gives you complete control over fade shapes and durations at no cost. Select the portion of audio you want to fade, go to Effect > Fading, and choose from linear fade in, linear fade out, or Studio Fade Out—which applies a logarithmic curve that sounds more professional than the straight linear version.
For more precise control, the Envelope Tool lets you draw a custom volume curve by hand, placing points at exact moments and dragging them to any volume level. This is how you’d do something like a gradual dip under a voiceover, hold at a lower volume for the duration of the narration, then fade back up when the voice stops—all in the same track without splitting the clip.
The crossfade feature requires placing two clips on separate tracks and applying complementary fades manually, which is workable but slower than dedicated crossfade tools. For simple fade in/out on a single track, Audacity is as fast as anything else.
Descript — Best for Podcast and Video Producers
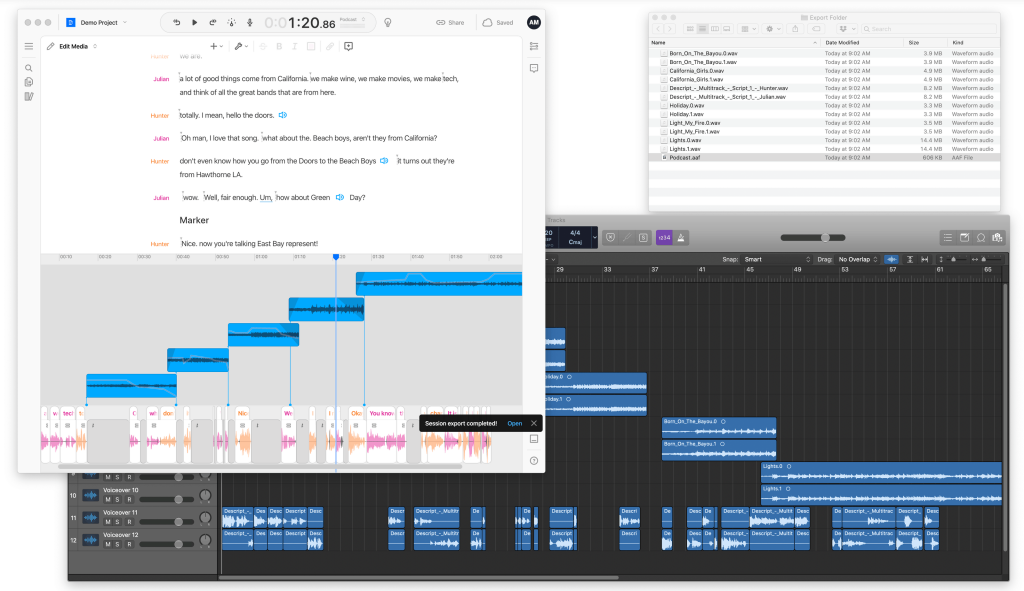
Descript is primarily a transcript-based editor, but it handles music and background audio tracks as well. You can add fade in and fade out to any audio clip by right-clicking the clip edge and dragging the fade handle—the whole operation takes about five seconds and updates in real time as you drag.
This is useful specifically for podcast producers who are adding music beds and want them to fade under the voiceover content. The visual editing approach—where you’re working with waveforms and transcript simultaneously—makes it easy to line up a fade out to the exact moment the narration ends without switching to a timeline-only view.
It’s not a full DAW and doesn’t give you the envelope control that Audacity does, but for the most common fade use cases in podcast and video production, it’s fast enough that most people don’t need more than this.
Auphonic — Best for Automated Fade Handling in Podcasts

Auphonic handles audio processing automatically, including fade in and fade out on music tracks. If you’re using Auphonic as your podcast mastering step—which many producers do—you can configure it to apply a fade in at the start of your music track and a fade out at the end automatically every time you process an episode.
This removes the manual step entirely for recurring audio formats. You set the fade duration once in the production settings, and every episode processed through Auphonic gets consistent fades without touching a timeline editor. For high-volume podcast producers who process dozens of episodes and want consistent output without doing the same edits repeatedly, this matters a lot.
Kapwing — Best for Adding Fades to Music in Video Projects

Kapwing is primarily a video editor, but it includes fade in and fade out controls on audio tracks that are clean enough for most video production needs. For creators adding background music to YouTube videos, social media clips, or course content, Kapwing lets you add the fade directly in the same tool where you’re editing the video—no need to export audio, fade it in a separate tool, and reimport.
The fade controls in Kapwing are straightforward: select the audio clip, adjust the fade in duration at the start and the fade out duration at the end using a simple slider. It’s not as precise as a dedicated audio editor, but for video content where the audio just needs to not distract from the visual, it’s fast and sufficient.
Getting the Duration Right
There’s no universal rule for fade duration, but here’s a starting framework:
- Fade in on background music: 0.5 to 1.5 seconds
- Fade in on a standalone track: 1 to 3 seconds
- Fade out on background music under voice: 1 to 2 seconds
- Fade out at the end of a podcast or video: 3 to 5 seconds
- Fade out at the end of a standalone music track: 4 to 8 seconds for music with sustained notes or reverb
- Crossfade between two clips: 0.5 to 2 seconds for music, 50 to 200 milliseconds for dialogue
According to Apple’s Logic Pro documentation on volume automation, a logarithmic fade curve is recommended for most fade-out applications precisely because the human ear perceives volume logarithmically—so a curve that matches that perception sounds more natural than a straight line dropping at a constant rate.
The real test is always your ears. Render the fade, listen on headphones, listen on speakers, and adjust. A fade that sounds right in context is the right fade. Duration guidelines are just where you start.
Conclusion
Fade in and fade out effects are simple edits with a big impact on how professional your audio sounds. The technique itself takes five minutes to learn. Getting the duration and curve right for your specific situation is mostly a matter of listening and adjusting.
Any of the tools above will handle the basics. Start with Audacity if you need free and full-featured. Use Descript or Kapwing if your audio edits live inside a larger video or podcast workflow. Use Auphonic if you want fades to happen automatically without touching a timeline at all.



Leave a Comment